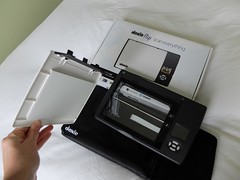
I’m pretty picky about reviewing things that aren’t notebooks. I’ve occasionally been asked to review notebook covers or pen holders and the like, but I usually decline the samples, as I’m just not that interested. So when the makers of the Doxie Flip Scanner offered me a sample to try, I at first thought I should pass. (I also thought it was odd that they had named their product with an archaic term for a prostitute.) But the more I thought about it, I realized this was a product that could really solve a problem for me.
I live in New York City, which is not known for combining spaciousness and affordability in real estate! It’s bad enough that I have lots of books and notebooks and art supplies taking up space without having to make room for other things like furniture and people. I’ve always had laptop computers because a desktop and monitor would take up too much space. As for other electronics, I do have a scanner/copier/printer combo unit that is relatively sleek, but even that is too big for me to be able to leave it out and plugged in and ready to use. When I want to scan something, I have to clear a surface for it, move it, run a cord to an outlet and be wary of tripping over it, and the whole thing is such a rigamarole that I just put it off or give up. When I see images of notebooks in magazines and newspapers, I usually just snap a photo of them with my iPhone, and sometimes I’ll do the same with drawings in my sketchbooks that I want to share, even though they don’t look that great. So for me, the idea of a portable, battery powered scanner sized just right for notebooks was very attractive.
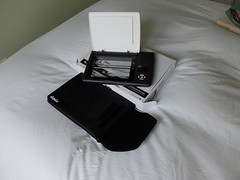
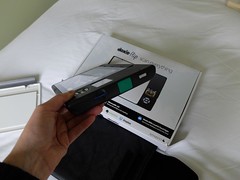
The Doxie sample arrived in a rather large box, but that was because a press kit of goodies was included. Doxie has a partnership with Field Notes, so I received a custom edition Field Notes, plus one of their regular 3-packs, along with an assortment of sample things to scan, such as fabric, photos, and old postcards. I also received a carrying case for the scanner. The Doxie Flip itself was in a smaller box, which was nice and easy to open– none of that horrible plastic you have to cut with a razor! You pull off a couple of plastic seals and a battery tab, and boom, within seconds you can turn it on and start scanning. And for once, you will WANT to read the instruction manual even though the product is so simple to use you almost won’t need to–Â the manual is attractively designed and printed in an adorable notebook!
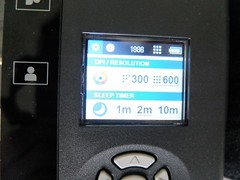
There is a small screen with simple settings– 300 dpi or 600 dpi, and a choice of how long the device should stay on before it shuts itself off to save power. There’s an on/off slider switch, a big green “scan” button, and a slot with a 4GB SD card. All blissfully simple.
The whole unit is very light, about the size and heft of a quality paperback book, and slimmer and lighter than most hardcovers. You can scan small items the usual way by placing them on the scanner bed and closing the lid over them. The scanner lid pops off easily so you can also turn the scanner over and place it on top of what you’re scanning. (I found that it could sometimes pop off a little too easily– it doesn’t have the kind of flexible joint some larger scanners have, so you can’t press it flat against anything thick or the leverage might pop it off the base.)
The bottom of the scanner has a clear plastic panel that allows you to align your scan. That’s the “flip” aspect of it. I found it natural to flip it on a horizontal axis, but it turned out that made all my scans come out upside down. If you flip it sideways, as if you were turning the page of a book, they’ll be oriented correctly. But the scanner is wider that way, so it’s a bit awkward. Either way, it’s not a big deal as you can always reorient the scans later. And I had not noticed at first that there are little icons on both sides of the scanner that tell you which way is up.
I played around with it a bit, walking around scanning things in odd locations. The scans won’t be clear unless the material is flat against the scanner bed, but you can get some interesting effects by holding it at odd angles. And it’s so light and small, you can maneuver it pretty much anywhere. I’m sure a lot of people are really happy that they can now scan their butt without the risk of accident or injury to one’s person or to an expensive piece of office equipment.
A few scans of note:
My fingertips on the screen in a dark room:
The TV screen showing a football game:
My iPhone, which turned itself off during the scanning process:
Notebook pages– one shows what happens if you move the notebook slightly. Some are 300 dpi and some are 600 dpi.
Other assorted stuff. You can see larger versions of these images on Flickr.
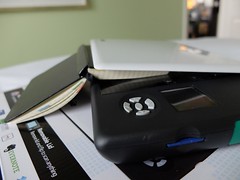
The scanning area is approximately 4 x 6″. This is a great size for postcards or photos, but I actually found it a little awkward for notebooks, at least in some ways. I wish they had made it just a teeny bit bigger, so you could scan a full double spread of a standard pocket-size notebook– that would mean a scanner area of about 5.5 x 7″. As it is, you can only scan one page at a time. My first test scans of a pencil drawing in a squared Piccadilly notebook came out with some bleached-out areas, perhaps because I hadn’t pressed down enough on the notebook, or perhaps because it was hard to get an even pressure without being able to get the whole spread on the scanner bed. (Scanning a thinner Field Notes or Moleskine Cahier-type notebook would be a little easier.) Given that they are really targeting this scanner at users of Field Notes and other notebooks, it’s really a shame not to have that perfect fit to a page spread. I know it would probably mean a slightly higher price and larger overall size, but to me, it would be worth it.
When you’ve stopped running around scanning artwork on your walls, your bathroom tiles, your television, your rug, your floor, your face, your friends’ ears, and whatever else strikes your fancy, you install a quick piece of software on your computer or iPad, and then connect the SD card, either via an SD slot, an included SD-to-USB adapter, or an iPad adapter that can be purchased separately. You can edit your scans in various ways and save them as PDFs or JPEGs. The next version of Doxie’s software is supposed to offer an Auto-Stitch feature that will allow you to scan a larger image in overlapping sections and combine them, which would help with the issue of not being able to scan a notebook page spread. You can also “staple” together multiple images to save them as pages in a single PDF document. In general, I found the interface to be a lot more simple and intuitive than other scanner software I’ve used.
All in all, I think this is a great product. I haven’t tried any other portable scanners, so I can’t say how this might measure up against them, but just to judge the Doxie on its own merits, I found it easy and fun to use, and as I said at the beginning of the review, it’s solved a problem for me. It does what you want it to do, aside from the issue of the size vs. a full notebook spread. I can see it coming in handy for all sorts of people– students, artists, scrapbookers and many more.
Check out the full tech specs at the Doxie website. Suggested retail is $149, plus $19 for the carrying case. It would make a great holiday gift– you can snap one up at Amazon.
Now, about that giveaway! I will select a lucky winner to receive the Field Notes mixed 3-pack AND the custom Doxie Field Notes. Just enter in one of the following ways:
On Twitter, tweet something containing “Doxie Flip,†“@Doxie” and “@NotebookStoriesâ€, and follow “@NotebookStories.â€
On Facebook, “like†the Notebook Stories page , and post something containing the words “Doxie Flip” on the Notebook Stories wall.
On your blog, post something containing the words “Doxie Flip†and “Notebook Stories†and link back to this post.
The deadline for entry is Friday December 20 at 11:59PM, EST. Good luck everyone!
And please remember to check my posts on Facebook and Twitter for an announcement of the winner.

